
|
Creating Default Replacement Skins
- Download Existing Replacement Sets
- Setup and Required Downloads
- Creating A Default Replacement Skin
- Tips
Download Existing Replacement Sets
I don't see the point in duplicating work, so this tutorial assumes that you are working from an existing default replacement skin package for reference instead of creating your own. You are welcome to start with mine. They can be found in the Default Replacement Skins section of this web site.
If you are interested in creating your own default replacements from scratch, check out the MTS2 tutorial by WhoGivesADam, Changing Default Textures - Without editing Sims07.package.
Setup and Required Downloads
You will need SimPE. The illustrations in this tutorial use version 0.52.
You will need the nVIDIA DDS utilities.
Creating A Default Replacement Skin
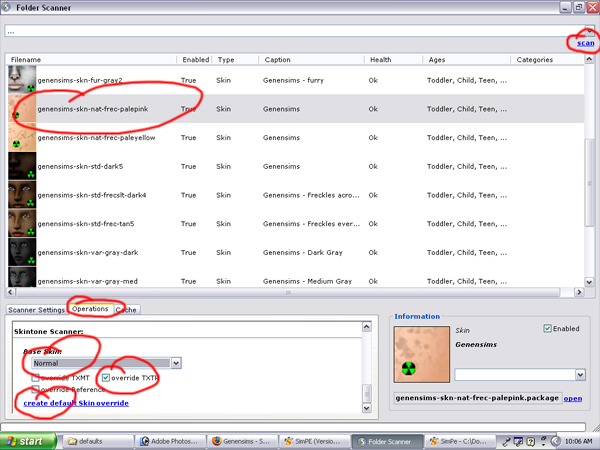
- Open SimPE's File Browser. Select the directory that contains the skin you want to make a default replacement version of and scan.
- Select the skin you want, select the "Operations" tab and find the "Skintone Scanner" section.
- Set the "Base Skin" to the one you want to replace and check the "Override TXTR" box. Then click "create default skin Override". Be sure to name your package something that will be easy to identify later.
- Open the new package in SimPE, select "Texture Image" in the resource treeand sort by "type".
- Compare the listing of textures to the list below and make certain that all the textures are present. The number at the end indicates what default skin it replaces (light=1, normal=2, medium=3, dark=5, alien=5).
afbodynaked-nudecut-s1_txtr
afbodynaked-nude-s1_txtr
afbodynaked-nudesoft-s1_txtr
afface-s1_txtr
ambodynaked-nudecut-s1_txtr
ambodynaked-nude-s1_txtr
ambodynaked-nudesoft-s1_txtr
amface-s1_txtr
bubodynaked-nude-s1_txtr
buface-s1_txtr
cubodynaked-nude-s1_txtr
cuface-s1_txtr
efbodynaked-nudecut-s1_txtr
efbodynaked-nude-s1_txtr
efbodynaked-nudesoft-s1_txtr
efface-s1_txtr
efhairbald-skin-s1_txtr
embodynaked-nudecut-s1_txtr
embodynaked-nude-s1_txtr
embodynaked-nudesoft-s1_txtr
emface-s1_txtr
emhairbald-skin-s1_txtr
pubodynaked-nude-s1_txtr
puface-s1_txtr
tfbodynaked-nudecut-s1_txtr
tfbodynaked-nude-s1_txtr
tfbodynaked-nudesoft-s1_txtr
tmbodynaked-nudecut-s1_txtr
tmbodynaked-nude-s1_txtr
tmbodynaked-nudesoft-s1_txtr
tmface-s1_txtr
ufhairbald-skin-s1_txtr
umhairbald-skin-s1_txtr
- If you find a texture that doesn't belong, delete it.
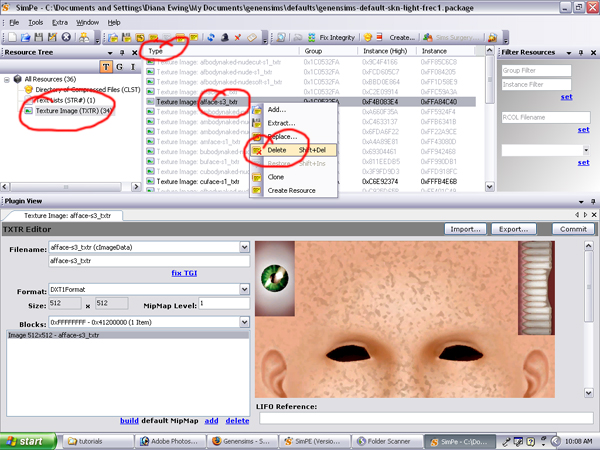
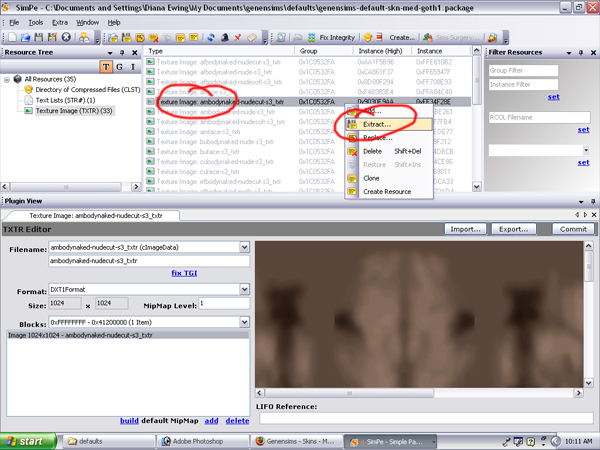
- If a texture is missing, open the template file for the skin you are replacing in SimPE.
- Find the missing texture, right click, and "Extract". Save it with a filename that is easy to identify, like "ambodycut".
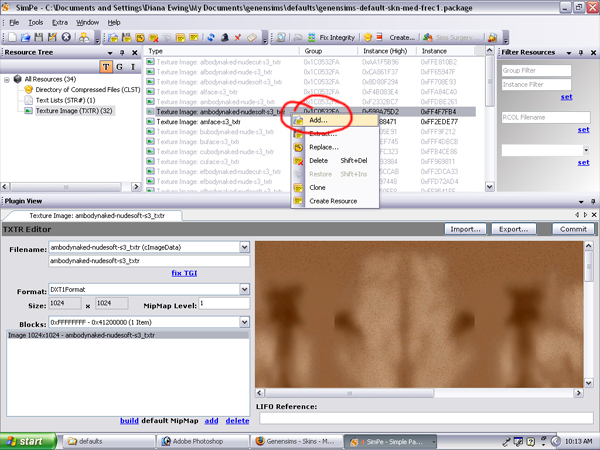
- Go back to the default replacement package you are building. Right-click in the resource window and "Add...".
- Open the original skin package in SimPE.
- To find the texture, Click on "Material Definition" in the resource tree and select the missing texture.
- In Plugin View, click on the "All References" tab and "stdMatBaseTextureName"
- Copy the "Instance" on the right-hand side of the Plugin View window into the Filter Resources window. Click "Set".
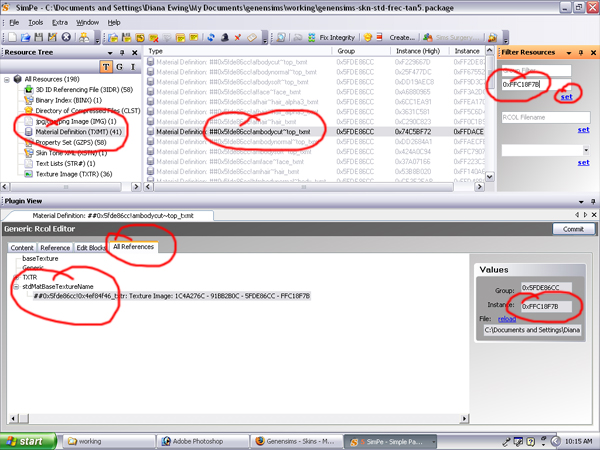
- Click on "Texture Image" in the resource tree and select the only available resource.
- Right-click on the image in Plugin View and "Export...". Be sure to save the file as PNG with a filename that will be easy to identify, like "ambodycut.png".

- Go back to the replacement package you are building and select the new texture. It will be in italics.
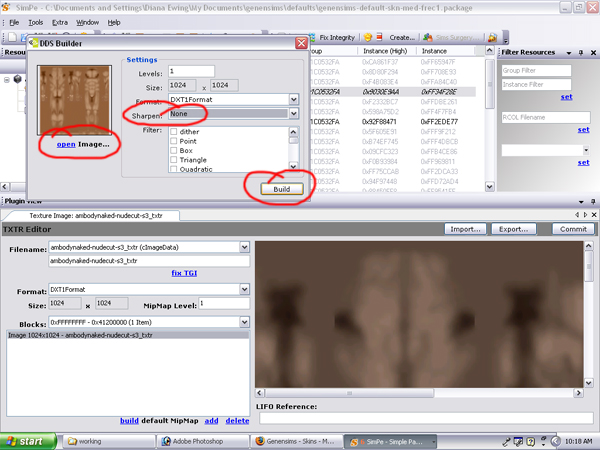
- Right-click on the image in Plugin View and select "Build DTX..."

- In the DDS Builder window "Open" the texture image you just extracted. Set "Sharpen" to None and click the "Build" button.
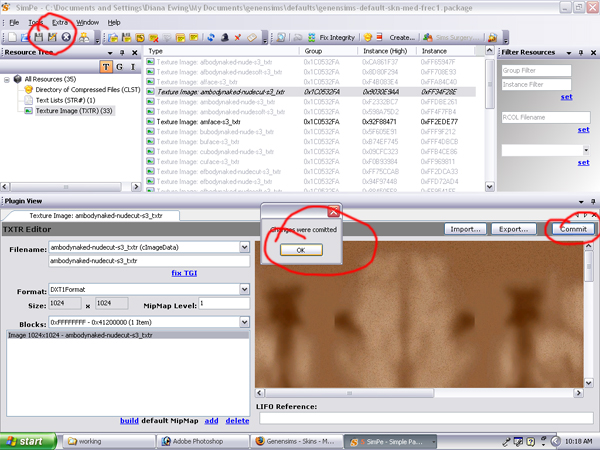
- Click the "Commit" button, "OK", and save your package.
- Repeat the process until all missing textures are in your package.
Tips
- Always export images in PNG format. You cannot re-import them otherwise.
- Clearly re-name your packages. I recommend naming your templates something like "default-template-SkinLight.package", and your final packages something like "default-SkinLight1.package".
|
|


![[New]](/img/menu_new.jpg)
![[Genetic Sets]](/img/menu_geneticsets.jpg)
![[Skins]](/img/menu_skins.jpg)
![[Eyes]](/img/menu_eyes.jpg)
![[Hair]](/img/menu_hair.jpg)
![[Clothing]](/img/menu_clothing.jpg)
![[Makeup]](/img/menu_makeup.jpg)
![[Message Board]](/img/menu_messageboard.jpg)
![[Bobcatben's Lab]](/img/menu_bobcatbenslab.jpg)
![[Madame Mim's Lab]](/img/menu_MadameMims.jpg)
![[Donate]](/img/menu_donate.jpg)
![[Information]](/img/menu_information.jpg)
![[FAQ]](/img/menusub_FAQ.jpg)
![[Product Notes]](/img/menusub_productnotes.jpg)
![[Tutorials]](/img/menusub_tutorials.jpg)
![[Contact]](/img/menusub_contact.jpg)
![[Links]](/img/menusub_links.jpg)

